ASN1VE 1.7.x Help
ASN1VE is a graphical user interface (GUI) tool that can be used to:
- Analyze the structure of ASN.1 BER or DER encoded data
- Edit encoded fields within existing messages or create new messages.
ASN1VE will display an encoded message in two different views:
- Tag View: This view will display a message in a generic form showing tags, lengths, and data. This is the default view when a message file is first opened. It is also the only view shown if no ASN.1 schema is assigned to describe the message.
- Element View: This view will display the structure of a message using type and element names from an assigned ASN.1 schema definition. The schema is assigned using the 'Assign ASN.1' or 'Assign ASN.1 Wizard' commands. This view will also allow editing of the encoded fields of the BER message.
ASN2XML (ASN.1 to XML translator) is a command line tool for converting BER-encoded ASN.1 data into XML form.. Documentation for this tool is available in the asn2xmlManual.html file in the doc subdirectory of this installation
The various operations of ASN1VE are described below:
- Creating a binary message from hex data
- Creating a binary message from PEM/Base64 data
- Creating a new binary message using an ASN.1 schema
- Opening a binary, hex text, or base64 message
- Assigning an ASN.1 schema to a binary message
- Assigning an ASN.1 schema to a binary message using the wizard
- Selecting a Protocol Data Unit (PDU) type
- Editing an ASN.1 message
- Deleting Elements
- Decoding open type data
- Closing the assigned ASN.1 schema
Help on various dialogs:
A new message can be created by using text from a hexadecimal dump file or entering hex byte codes directly. To do this, use the File/New Message command. From the menu bar, select the File option. A submenu will be displayed as follows:
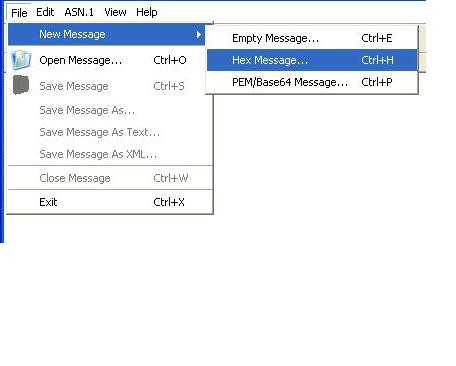 |
Select the New Message > Hex Message option to open a hex editor. The control-H hot key can also be used to do this. |
This will cause the following Hex Editor dialog box to be displayed
allowing you to create or copy the hex dump data:
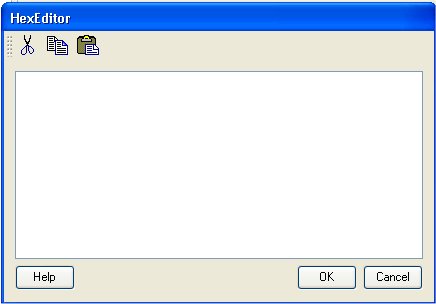
This dialog will accept all characters, but only hex characters [A-Za-z0-9] will be converted to binary data. Whitespace will be ignored. Non-hex characters will be shown in red. An attempt to convert data containing non-hex characters will result in an error. In order to create a binary message, only valid hex characters and whitespace may be present in the display. Non-hex characters must be deleted.
By pressing the OK button, ASN1VE will attempt to convert the hex data to a binary message. It is assumed that this binary message contains valid BER/DER encoded data. ASN1VE will try to decode the binary message and, if successful, the data will be shown using the standard ASN.1 views (tree view in the left pane and tabbed Hex, XML, or Text views in the center pane). If the entered data cannot be generically decoded, an error popup will be displayed. If an ASN.1 schema is currently active, the message will be decoded using it. If the message cannot be decoded using the schema, an error popup will be displayed
By pressing the Cancel button, ASN1VE will discard the data entered using the hex editor.
A new message can be created by using text from a Privacy Enhanced Mail (PEM) base64-encoded file. Alternatively, the base64 text can be entered directly (although it it is usually copied and pasted). To do this, use the File/New Message command. From the menu bar, select the File option. A submenu will be displayed as follows:
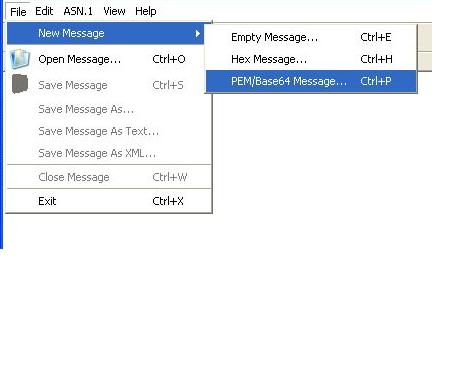 |
Select the New Message > PEM/Base64 Message option to open a hex editor. The control-P hot key can also be used to do this. |
This will cause the PEM/Base64 Editor dialog box to be displayed.
This is similar to the hex editor dialog box. Unencrypted date from
a PER/Base64 certificate file can be pasted into the text editor
pane or entered directly. When OK is pressed, the data is converted
to binary and if it is a well-formed BER/DER encoded message, it
will be displayed in the viewer.
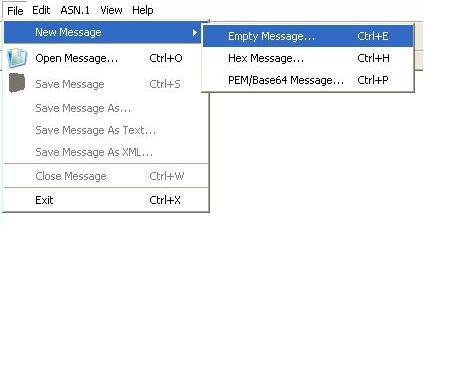 |
Select the New Message > Empty Message option to open a empty message creation wizard. The control-E hot key can also be used to do this. |
This will cause the following Create Empty Message dialog box to be displayed allowing you to create a binary message:
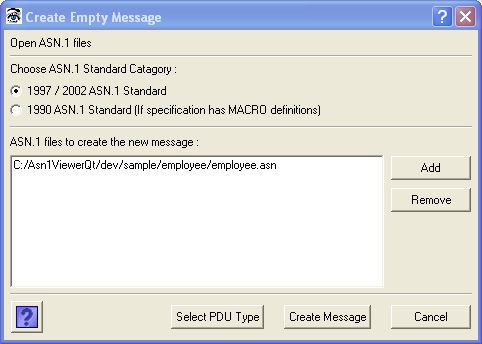
This dialog allows the user to select ASN.1 files and the ASN.1 version. The ASN.1 version options are as follows:
- 1997 / 2002 version: By default this option will be selected.
- 1990 version: If ASN.1 files are using MACRO definitions, then this option should be selected.
The Add ASN.1 file option will allow the user to add the ASN.1 files required to create a new message. Note: The Select PDU Type or Create Message buttons will only be enabled after adding ASN.1 files to the project.
If there is only a single possible PDU type for the message, the Create Message button will be displayed in addition to Select PDU Type. Users may use this button to bypass the PDU selection step and directly create a new message.
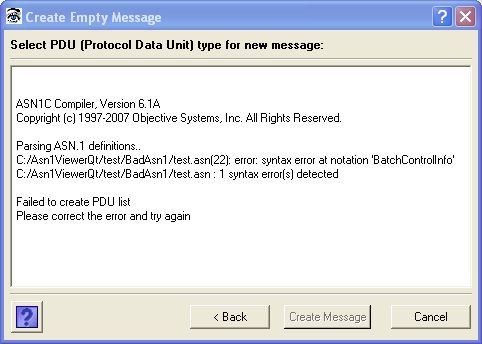
On pressing Select PDU Type button, ASN1VE will validate the ASN.1 file. If the ASN.1 files has syntax errors, then the following dialog will be displayed. A syntax error or missing definition error will be printed in the output window. The user can cancel the operation or correct the ASN.1 files and try again by pressing the back button.
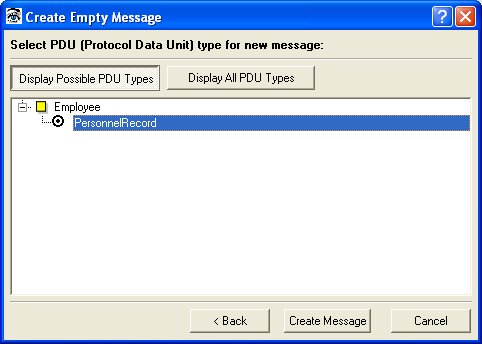
If the validation is successful, then the following dialog will be displayed allowing the user to select the PDU type for the message. This window will display the list of module names in the selected ASN.1 specifications. Each module will contain a list of all of the type names in that module.
The PDU type display options are as follows:
- Display All Types: This option will display all of the types for each module.
- Display Possible PDU types: This option will display only those
types that are most likely to be used for a new message. This is
defined to be all types in the module that are not referenced by
any other types. If no types meet this criteria, then no types will
be displayed in that module's type list.
The Create Message button will be enabled after selecting the PDU type. On pressing this button, ASN1VE will create a new message using the selected PDU type with all data values set to empty (zero). The message view will be switched to element view. The user can then begin normal editing on the message to populate the fields with data.
To select a pre-existing BER/DER message file for viewing, use the File/Open Message command. From the menu bar, select the File option. A submenu will be displayed as follows:
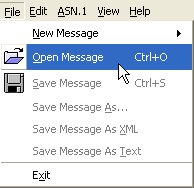 |
Select the Open Message option to open a message file. (Note: the command line shortcut Ctl+O can also be used). |
This will cause a file navigation dialog box to be displayed
allowing the selection of a file to view. This file can contain
binary, hexadecimal text, or base64 text. When the file is opened,
it is first scanned to determine if it contains all textual data
characters. If it does not, it is assumed to be binary and opened
immediately. Otherwise, a sub-menu is displayed with radio buttons
asking for the file type (binary, hex text, or base64). The user
would then select the type and a conversion is done to get the data
into binary form for display/editing.
The converted file must contain well-formed BER or DER encoded ASN.1 data.
To save an edited BER/DER message file, one of the various File -> Save Message options can be used. The following diagram shows the different options:
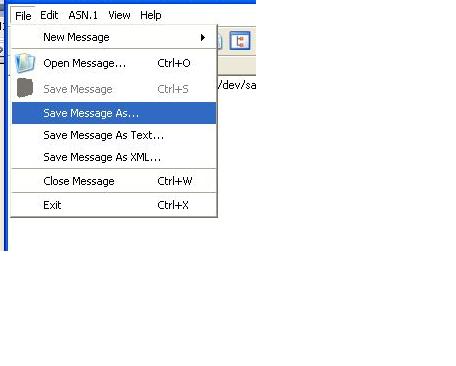 |
Select one of the Save Message option to save a message file. |
The Save Message option will only be enabled if the existing ASN.1 file that was modified. This command saves the file back to the file that was opened. The original format of this file is preserved. For example, if a base64 encoded file was opened, it is saved back as base64.
 |
Select the Assign ASN.1 option to open a find dialog. |
This will cause a file navigation dialog box to be displayed
allowing the selection of a file. These files must contain ASN.1
definitions only. Multiple ASN.1 files may be selected if the
message being described requires multiple schemas (for example, if
a given ASN.1 file imports definitions from another file).
ASN1VE will attempt to compile the selected ASN.1 files. If the files contain syntax or other errors, then an error message dialog will be displayed. The user should correct the errors in the ASN.1 files and try again. If the ASN.1 files are compiled successfully, then ASN1VE will create a list of PDU (Protocol Data Unit) types.
After successful compilation of the ASN.1 file(s),
- If a single matching PDU type is found in the schema that matches the current message being displayed, then ASN1VE will decode the message using the matched PDU type and the view will be switched to element view.
- If multiple matching PDU types are found, then ASN1VE will prompt the user to select a PDU type using the Select PDU type dialog. ASN1VE will try to decode the message with the user-selected PDU type and the view will be switched to element view if decoding is successful.
NOTE: If the ASN.1 files are of the older1990 version, then the "Assign ASN.1 Wizard" command must be used instead of this command.
|
Select the Assign ASN.1 Wizard option to open a wizard dialog. |
This will cause a wizard dialog box to be displayed allowing the
assignment of ASN.1 files from different locations and of different
versions of ASN.1 files to the message.
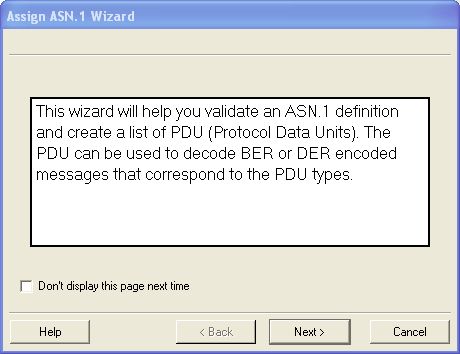
The first page of this wizard will display information about
this wizard. This page can be disabled for the next operation by
selecting "Don't display this page next time" option.
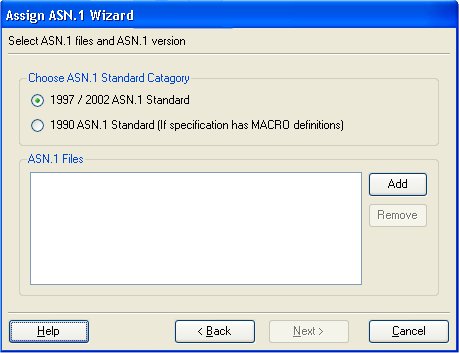
The second page of this wizard will allow the user to select ASN.1
files and the ASN.1 version. The ASN.1 version options are as
follows:
- 1997 / 2002 version: By default this option will be selected.
- 1990 version: If ASN.1 files are using MACRO definitions, then this option should be selected.
The Add ASN.1 file option will allow the user to add the ASN.1
files required to decode the message. Note: The Next button will
only be enabled after adding ASN.1 files to the project.
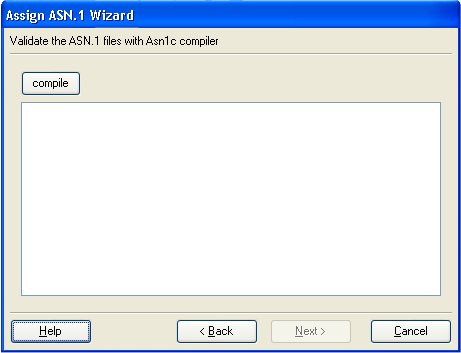
The third page of the wizard will allow the user to validate the
added ASN.1 files. ASN1VE will attempt to validate the selected
ASN.1 files when the 'compile' button is activated. If the
validation is successful, then the Next button will be enabled. If
the validation fails, a syntax error or missing definition error
will be printed in the output window. The user can cancel the
operation or correct the ASN.1 files for given errors and press the
compile button again.
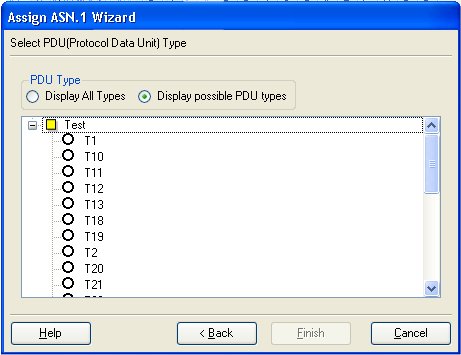
The fourth page of the wizard allows the user to select the PDU
type for the message. The window will display the list of module
names in the selected ASN.1 specifications. Each module will
contain a list of all of the type names in that module.
The PDU type display options are as follows:
- Display All Types: This option will display all of the types for each module.
- Display Possible PDU types: ASN1VE will display only those
types that can be possibly used to decode the current message. If
no types meet this criteria, then no types will be displayed in
that module's type list.
The Finish button will be enabled after selecting the PDU type.
On pressing the Finish button, ASN1VE will try to decode the
message using the selected PDU type. If successful, the message
view will be switched to element view.
 |
Select the Select PDU Type option. |
This option will only be enabled after assigning an ASN.1
file.
This will cause the following select PDU type dialog box to be
displayed allowing you to select / change the PDU type definition
for the current message.
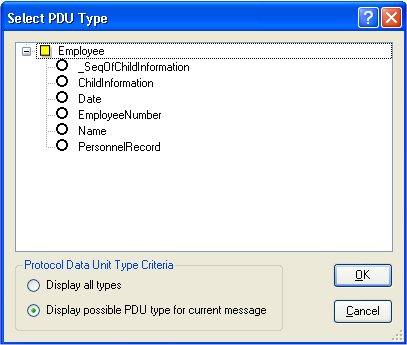
The dialog box will display the list of modules, and each module
will contain a list of types. Types within the modules are
selectable using radio buttons.
Options related to the displayed types are as follows:
- Display All Types: This option will display all the types for each module.
- Display Possible PDU types: ASN1VE will display only those
types that can be possibly used to decode the current message. If
no types meet this criteria, then no types will be displayed in
that module's type list.
On pressing the OK button, ASN1VE will try to decode the current message using the selected PDU type. If successful, the view will be switched to element view.
The Cancel button is used to cancel the operation.
An ASN.1-encoded message may contain fields that contain 'open type' data. These are fields whose type is typically determined by the value of another field at run-time. ASN1VE will try to find the ASN.1 type definition from the assigned ASN.1 file for each open type field. If successful, ASN1VE will decode the open type field using the appropriate ASN.1 type definition.
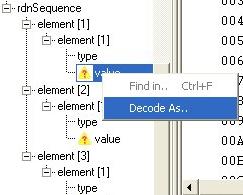 |
If ASN1VE is not able to determine the ASN.1 type, then it will give options to the user to select the type definition. The failed to decode open type node will be displayed with a warning icon. You can right click on this node and select the "Decode As" option. This will display the ASN.1 type selection box for this open type data. On selection of ASN.1 type definition, ASN1VE will decode this open type data with the selected type definition. |
Note: The right click menu option, "Decode As" will be available for failed to decode open type node only.
Refer to the configuration option to disable this automatic open type decoding operation.
This option will only be enabled after assigning an ASN.1 file.
Once an ASN.1 file or set of ASN.1 files have been opened to work with a given message, they will remain open until explicitly closed. Other binary messages that are created or opened within this time will attempt to be decoded using the loaded schema.
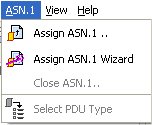
To close the ASN.1 file or assign another ASN.1 file, use the ASN.1/Close ASN.1 command. From the menu bar, select the ASN.1 option. A submenu will be displayed as follows:
|
Select the Close ASN.1 option. |
Once the ASN.1 file and BER/DER encoded message are loaded,the
encoded fields of the message may be edited. To edit a field,
select the required field in tree view and the detail view will be
updated to display the appropriate edit box for value editing. The
various edit boxes for different ASN.1 types are described as
follows:
|
|
|
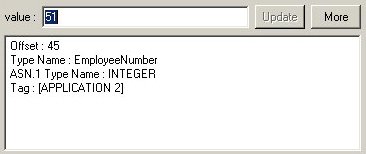
| INTEGER: This type value can be edited using the following dialog displayed in the detail view section. When the value is changed, the update button will be enabled. |
|
 |
|
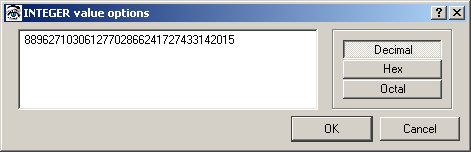
| By pressing the 'More' button, the following dialog will be displayed: | |
 |
|
| This will allow the integer value to be edited as a hexadecimal, octal, or decimal value. | |
|
|
|
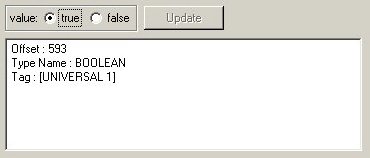
| BOOLEAN This type value can be edited using the following dialog displayed in the detail view. This dialog will replace the previously displayed dialog in the detail view, on the boolean type value selection in the tree view. |
|
 |
|
|
|
|
|
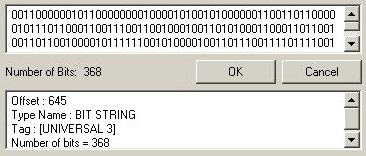
BIT STRING A push button is also available to allow the string to be edited in hexadecimal notation. |
|
 |
|
|
|
|
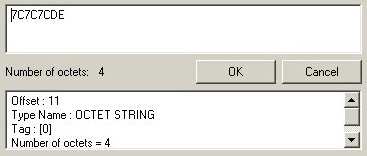
| OCTET STRING This type value can be edited using the following dialog displayed in the detail view. It will accept only hex characters (i.e. A,B, C, D, E, F, 0, 1, 2, 3, 4, 5, 6, 7, 8, 9), other characters will be marked as invalid. |
|
 |
|
|
|
|
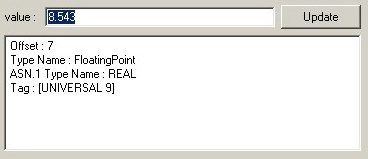
| REAL This type value can be edited using the following dialog displayed in the detail view. This dialog will replace the previously displayed dialog in the detail view, on the real type value selection in the tree view. |
|
 |
|
|
|
|
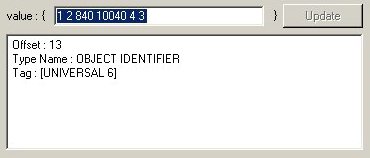
| OBJECT IDENTIFIER and
RELATIVEOID This type's value can be edited using the following dialog. The identifier value can be separated by a space. |
|
 |
|
|
|
|
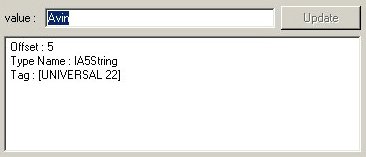
| CHARACTER STRING or Restricted Character
String This type value can be edited by the following dialog box. |
|
 |
|
|
|
|
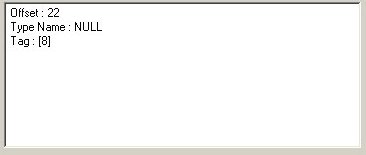
| NULL This type value will be displayed by the following dialog. This type doesn't require value editing. |
|
 |
|
|
|
|
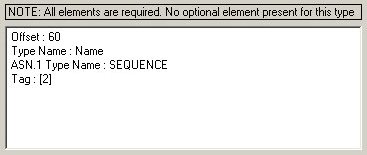
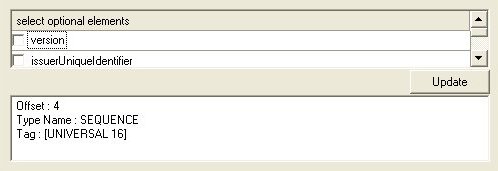
| SEQUENCE or SET This type element will be displayed with either of the following dialogs. The following dialog will be displayed when the Sequence/Set type does not have optional elements (i.e all elements values are required). |
|
 |
|
|
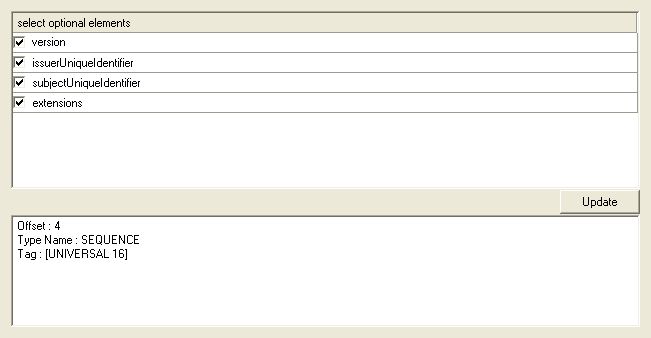
The following dialog will be displayed when the Sequence/Set
type has optional elements. Only optional elements are displayed
with the checkbox.
|
|
|
|
|
|
|
|
|
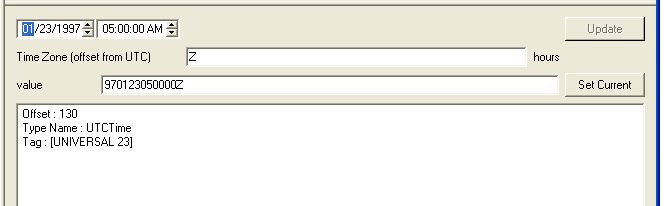
UTCTime or GeneralizedTime
|
|
 |
|
|
|
|
|
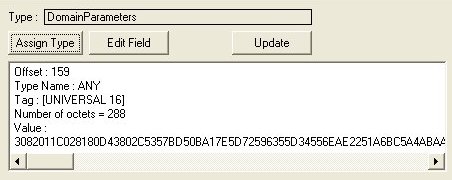
Open Type or ANY
The "Assign Type" button can be used to assign a type to the
open type according to the current value. This type can be used to
decode the open type value on update or refresh button call. |
|
|
|
|
After editing the value, the update/refresh button will be enabled. The refresh/update button can be used to update the binary message with the changes. Other views (XML or Text) are also updated.
To save the changes to current message, select the Save option from the File menu. To save the changes to different message file, use the SaveAs option from the File menu.
Elements may be deleted from a message in various ways:
1. In tree-view, an element can be right-clicked to display a
pop-up menu of relevant options. If deletion of the element is
valid in terms of the assigned schema (i.e. if the element is
optional or part of a repeating collection), then 'Delete' will be
enabled in the pop-up menu. If this is selected, the element is
deleted.
2. If no ASN.1 schema is assigned, any element in the message can be deleted by right-clicking the element in tree-view and selecting the 'Delete' option.
3. If a SEQUENCE or SET containing optional elements is edited, checkboxes will appear next to each of the elements in the edit window:
Elements can be removed from the message by unchecking the boxes.
4. The number of elements in a SEQUENCE OF item may be edited via a counter box:
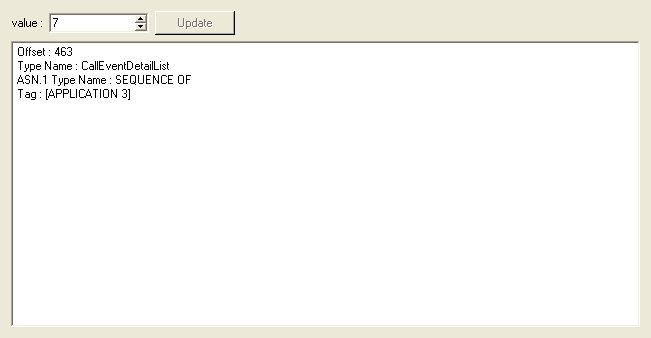
Selecting a smaller number of elements than what currently exists will cause elements to be truncated from the message.
To change the ASN1VE decoding options, use the Edit/Configure command. From the menu bar, select the Edit option. A submenu will be displayed as follows:
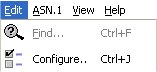 |
Select the Configure option to open a configuration options.(Note: the command line option Ctl+J can also be used). |
This will cause the following configuration option dialog box to be displayed which will allow the selection of decoding and editing options for ASN1VE:
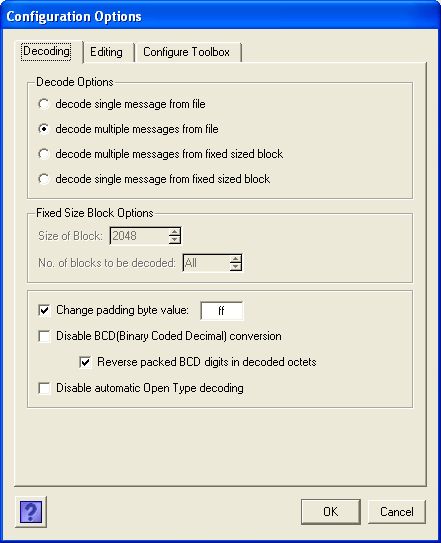
Decode Options: The various options are described as follows:
- Decode single message from file: ASN1VE will decode the first
message in the file and ignore the rest of the data.
- Decode multiple messages from file: ASN1VE will continue trying to decode messages from the file until either a) end of file (EOF) is reached, or b) a decode error occurs. This is the default behavior.
- Decode multiple messages from a fixed size block: ASN1VE will decode a series of messages from fixed size blocks. Selection of this option will also enable the other options related to the fixed size blocks.
- Decode a single message from a fixed size block: ASN1VE will decode a single message from each fixed size block and ignore the rest of the data in the block. Selection of this option will also enable the other options related to the fixed size blocks.
Fixed Size Block Options: These options are related to the fixed size blocks in messages. Several known Call Detail Record (CDR) formats use this type of storage. All of these options are available only when one of the fixed size block decoding options described above is selected.
- Size of block: This field accepts the value of the block
size in bytes. The maximum possible value for this field is
50000000.
- Number of blocks to be decoded: This field accepts the
value for the number of blocks to be decoded. By default, ASN1VE
will decode all the blocks in the message.
Changing padding byte value: By selecting this option, the user will be able to define additional padding byte values which usually appear between messages or at the end of a message. Padding bytes can be written in hex value and only one padding byte can be defined at any given time (for example, FF). The default padding byte value is 00.
Disable BCD (Binary Coded Decimal) conversion: This option is used for the following assignments:
TBCDSTRING ::= OCTET STRING
BCDString ::= OCTET STRING
The assignments can have constraints. By default, ASN1VE will decode this type as BCD. The result will have the HEX, ASCII and BCD value for this type. By selecting this option, ASN1VE will disable the BCD type conversion which will cause the result to be displayed in HEX and ASCII values for the type.
Reverse packed BCD digits in decoded octets: This option is related to the BCD option. It indicates whether digits encoded into each nibble in a BCD-encoded octet should be reversed upon decoding. BCD implementations exist that have the digits both ways (standard or reversed).
Disable automatic Open Type decoding: This option is used to disable the decoding of the open type data in the message. By default, ASN1VE will try to decode the open type with the appropriate ASN.1 type (searched by ASN1VE).

Check UTCTime and GeneralizedTime value format: This option is used to enable the strict format checking of the value entered for a time string. By default, ASN1VE will only check for valid characters without checking the overall format.
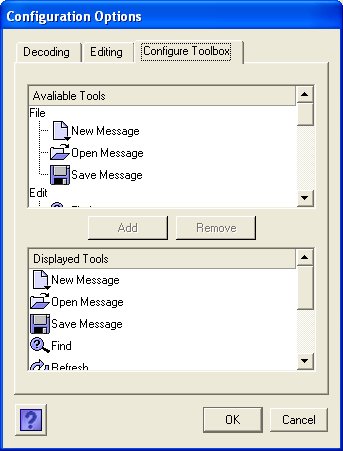
This option is used to change the toolbar buttons in ASN1VE. The Available Tools option show the buttons that can be displayed on the toolbar. The Display Tools option shows the buttons that will be set on the toolbar.
To find a specific data item in a message file, use the Edit/Find command. From the menu bar, select the Edit option. A submenu will be displayed as follows:
|
Select the Find option to open a find dialog.(Note: the command line option Ctl+F can also be used). |
This will
cause the following find dialog box to be displayed, allowing you
to find data in the current message set being displayed.
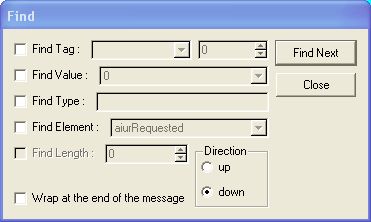
The Find command uses non-case sensitive searches for
all text data. Find options are described as follows:
- Find Tag: This option can be used to find a specific occurrence of an ASN.1 tag in the message. The first drop down menu will allow the selection of the tag class. (Note: the empty string represents the CONTEXT class). The second box allows the entry of the tag number. (Note: the tag number can't be a negative value).
- Find Value: This option can be used to find a specific ASN.1 value in the message. For example, an occurrence of the integer value '123'. (Note: value refers to the value in decoded form; not in the encoded form stored within the message).
- Find Type: This option can be used to find a specific ASN.1 data type in the message. This can be either a built-in or user-defined data type. For example, a user could search for the built-in type name 'SEQUENCE' to search for the next occurrence in the message of an ASN.1 SEQUENCE type. Or a user could search for 'MyType' to find the first occurrence of the user-defined type 'MyType' (Note: the message must be associated with an ASN.1 schema in order to find user-defined types).
- Find Element: This option is similar to 'Find Type' above except that element names within constructed types are searched. (Note: the message must be associated with an ASN.1 schema in order to find user-defined types and must be displayed using Element View)
- Find Length: This option can be used to find a length
value in decoded message. (Note: This option is only available with
the tag view)
If multiple options are defined, then ASN1VE will find the node in the tree window that includes all of the selected options (i.e. a logical AND of the options is done). If the node is selected in the left tree window, then the Find command will search for data in the selected node and it's child nodes. If a node is not selected in the left tree window, then the Find command will search the data in the entire tree window (all nodes).
ASN1VE allows two different views of the loaded message: tag view or element view.
ASN1VE will allow the view to be toggled between tag and element view. This can be done using either the pulldown menu entries under View or the two right-most toolbar buttons.
The following sections describe what is shown in the various
windows for each of these views.
The left window will show the internal structure of the BER/DER message by showing all of the tagged value containers.
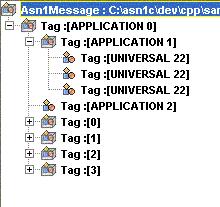 |
Each layer can be expanded/contracted by double-clicking on the tagged element or by clicking on the +/- box next to the element. |
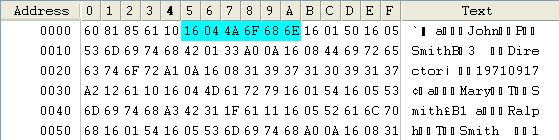
This will display the detail of the selected node related binary data with color-coding as follows:
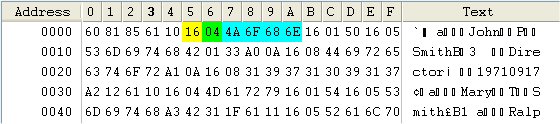 |
|
|
The offset of the data in the message can be determined by the "Offset" or "Address" column. Clicking on the "Address"/"Offset" button will cause the display to toggle between hex (Address) and decimal (Offset) display modes. Each byte's offset value will be displayed in tooltip.
Individual octet values within the message can be edited by double-clicking on the value or entering the new hex code on the selected octet. Note that data cannot be inserted or deleted; only individual byte values can be changed. The File/Save Message or File/Save Message As command can be used to save the altered file. This will cause the data to be decoded again and redisplayed.
This will display the decoded message as an XML message. The XML message will be created with the following two parameters:
- XML element name as the decoded tag name.
- XML element value as the decoded value for tag as follows:
- If the tag is a known ASN.1 type (i.e. a UNIVERSAL tag), then the value decoded and displayed in its decoded form.
- If the tag is not a known ASN.1 type, then the value would be displayed as hex representation of the data.
The bottom right window provides additional information on the
item selected tag in the tree window. The following information is
shown:
| Offset | Position of the data in the binary message. |
| Type | The name of the ASN.1 built-in type is displayed if the type can be determined from the tag value (i.e. if it is an ASN.1 universal tag). |
| Tag | Information on the class, form and identifier of the ASN.1 tag value. |
| Length | Length of the data element in octets. |
| Value | If the value type can be determined (i.e. if it is an ASN.1 built-in type with an explicit universal tag), the decoded contents value is displayed. |
Element view associates each of the tagged elements in the message with it's corresponding name from the ASN.1 schema. This view is displayed after a schema is loaded that contains a PDU type that matches the message. A name is associated with each item in the message. Also, type information in the schema makes it possible to decode the contents of all of the data fields. The decoded contents of each field are displayed in the data window in the lower right section of the display.
The element view will be blank if an ASN.1 schema is not assigned or a PDU type is not selected. By switching to this view, ASN1VE will decode the message using the assigned ASN.1 schema. If the message does not match a PDU type within the schema or if decoding fails, an error message will be displayed.
The left window will show the internal structure of the BER/DER message with the associated ASN.1 data type as follows:
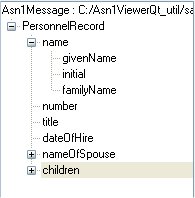 |
Each layer can be expanded/contracted by double-clicking on the element name or by clicking on the +/- box next to the element. |
The top right window will show BER/DER binary message data as hex dump. It will also display the detail of selected nodes related binary data with color-coding as follows:
 |
|
|
The offset of the data in the message can be determined by the "Offset" or "Address" column. Clicking on the "Address"/"Offset" button will cause the display to toggle between hex (Address) and decimal (Offset) display modes. Each byte's offset value will be displayed in tooltip.
Individual octet values within the message can be edited by double-clicking on the value and entering the new hex code. Note that data cannot be inserted or deleted; only individual byte values can be changed. The File/Save Message or File/Save Message AS command can be used to save the altered file. This will cause the data to be decoded again and redisplayed.
This will display the decoded message as an XML message. ASN.1 elements will be created as XML elements and values of the elements will be created using the names from the schema as XML tags. Values will be displayed in decoded form inside the XML tags.
| Offset | Position of the data in the binary message. |
| Type Name | The name of the element type defined in the assigned ASN.1 file. |
| ASN.1 Type Name | The name of the ASN.1 built-in type for the element type defined in assigned ASN.1 file. |
| Tag | Information on the class, form and identifier of the ASN.1 tag value. |
| Value | The decoded contents value. The value is decoded using the element type found in the assigned ASN.1 file. |